
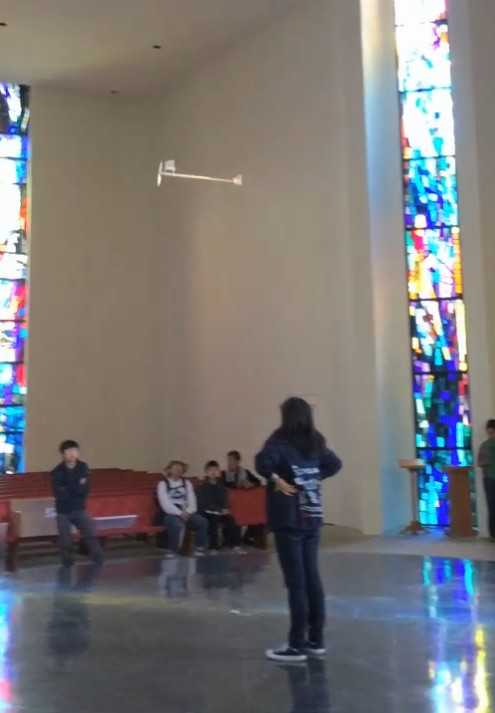
Last time, we got our building tricks squared away and built a solid Apache27s airplane. Now, let’s begin our next phase of the journey: flying.
Let’s review a few trimming tips to provide a clear understanding of not only how to adjust your airplane, but why each adjustment matters. Grasping the reasons behind every adjustment is critical to your success and will give you the foundational knowledge needed to design your own dream airplane in the future. In past years, many young Science Olympiad teams arrived at the Wright Stuff event with a well-built kit airplane, only to discover that without proper trimming, their aircraft simply could not perform. With the goal of achieving that optimal trim, please carefully put these steps into action.
Preflight Checks:
A successful flight starts with proper preflight checks. Not only must your airplane meet all weight and dimension limits, but its build quality must also be solid. Additionally, all key angles—such as left and down (if any) thrust, tail-boom tilt, and decalage (aka longitudinal dihedral, the difference between the main wing and the tail wing’s incidences)—must be carefully adjusted to match the design plan’s specifications.
If pulling, winding, and hooking up the rubber band are still new to you, take the time to practice safely so it becomes second nature. To help you build confidence and overcome any anxiety about snapping your motor, take a look at the approach outlined in this post. Practice truly makes perfect!
Initial Task: Power and Thrust
The first task in trimming a new airplane is making sure it has enough power and produces the right amount of thrust to climb. Luckily, for rubber-band-powered airplanes, the rubber band specified by the designer usually delivers more than enough torque at the beginning. As long as you wind the rubber band up to 1.0 oz-in (for the Apache27s) and let it unwind down to about 0.4 oz-in, the standard symmetric Ikara propeller should easily deliver plenty of climbing power! (We will talk about how to maximize the propeller and rubber band’s performance later.)
Once you have your power sorted out, the efficient wings of the Apache27 will then carry your airplane to the ceiling without hesitation, as you saw at my recent 2027 build workshop video. However, if an airplane is built badly and needs extra power, a last resort is to reduce the propeller pitch. Reducing the pitch lowers the drag produced by the propeller blades. With the same torque, the propeller spins faster, increasing thrust and helping the plane fly high, but for a shorter time.
Any properly trimmed airplane can take off with enough thrust. Even a brick can fly if you give it enough thrust! But that is not what the Wright Stuff event is about. Long duration is the real goal. We want to build an efficient airplane, not a brick. I am glad you all cleared that hurdle and built a solid Apache27 already.
Trimming Projection 1: The Side View (Lateral Axis / Pitch)
Once the airplane takes off, your keen observation is crucial. Pay attention to the airplane attitude at every moment. In your mind, you should immediately project the flight path, along with its velocity, onto the three planes of space (see the reference diagram below).
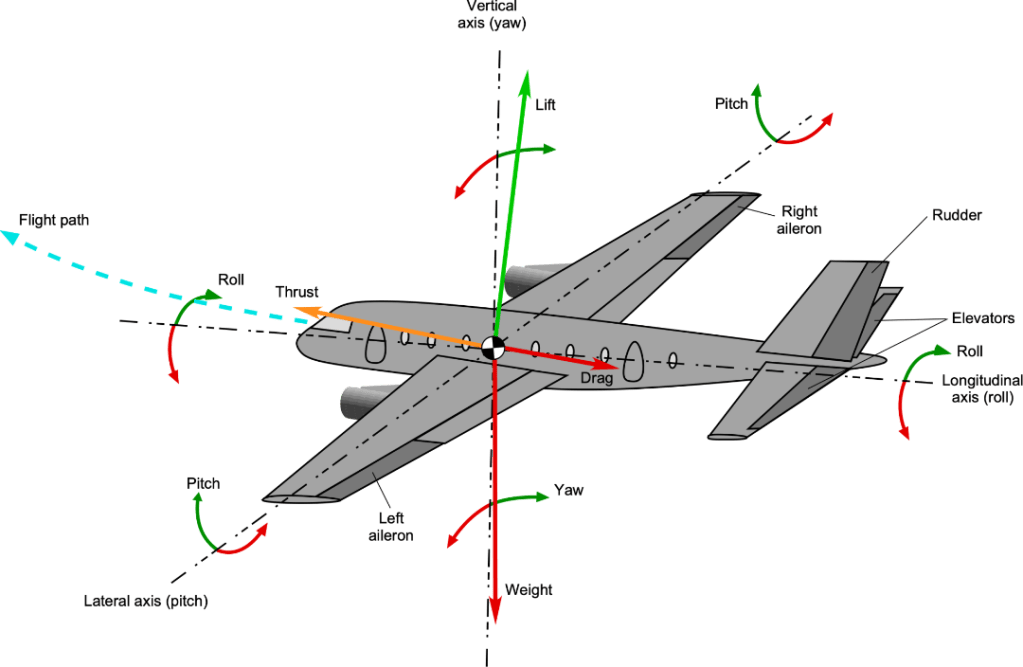
Following the principle of “separation of concerns” to focus on “one thing at a time,” let us look at the flight path projected onto the side view first. The goal is to make sure the airplane flies in a steady climb (and later gliding) state, with a few degrees of nose-up attitude, without periodical stalls, nor a straight nose-down dive.


We either move the center of gravity (CG) forward and backward, or adjust the main wing incidence, to reach this steady state. The goal and the approach of achieving a slow-but-not-too-slow gliding path is described in this post. Be sure to check it out if you have not.
- CG and Main Wing Incidence Work Together: One confusion for many students is whether to adjust the center of gravity alone, or adjust the main wing’s incidence only. The answer is both, because the two work together. For any single center of gravity location, there is only one proper main wing incidence that will make the airplane fly smoothly and steadily. And it works the other way around, too. If the CG is forward, the main wing carries a bigger share of the weight, so it needs a higher incidence to create more lift, to maintain that steady state. If the CG moves back, the reverse is true. A rear CG location requires a smaller main wing incidence, i.e., less decalage, meaning both the main wing and the positive-lifting tail share the weight more equally at optimized angles of attack, maximizing the overall aerodynamic efficiency of the airplane. There is a limit on how far back the CG can go, i.e., Neutral Point. Again, our goal is to fly with a rear-but-not-at-Neutral-Point CG location, with a corresponding main wing incidence, that stabilizes the airplane speed to a slow-but-not-too-slow speed, and to have the longest flight time.
- First Step for Initial Flights: For your first flights, keep the main wing incidence as close to the design plan as possible and only move the center of gravity to steady your flight path. This “one thing at a time” approach keeps things simple, since main wing incidence changes are tiny and very sensitive. Move the CG backward if the nose dives. If the airplane flies nose way up, and too slowly, or even stalls, move the CG forward for a faster and shallower climb. We will fine tune the main wing incidence, as well as CG location again, and achieve that slow-but-not-too-slow gliding speed in the next round of iteration. (Note, as shown in the same Slow-but-not-too-slow post: VminSinkRate is typically about 0.76 times the speed for best Lift-to-Drag, VbestSpeed.)
Trimming Projection 2: The Top View (Horizontal Plane / Turning)
Next, applying our “separation of concerns” strategy to the second plane, let us look at the top view of the airplane (see a reference sketch below).
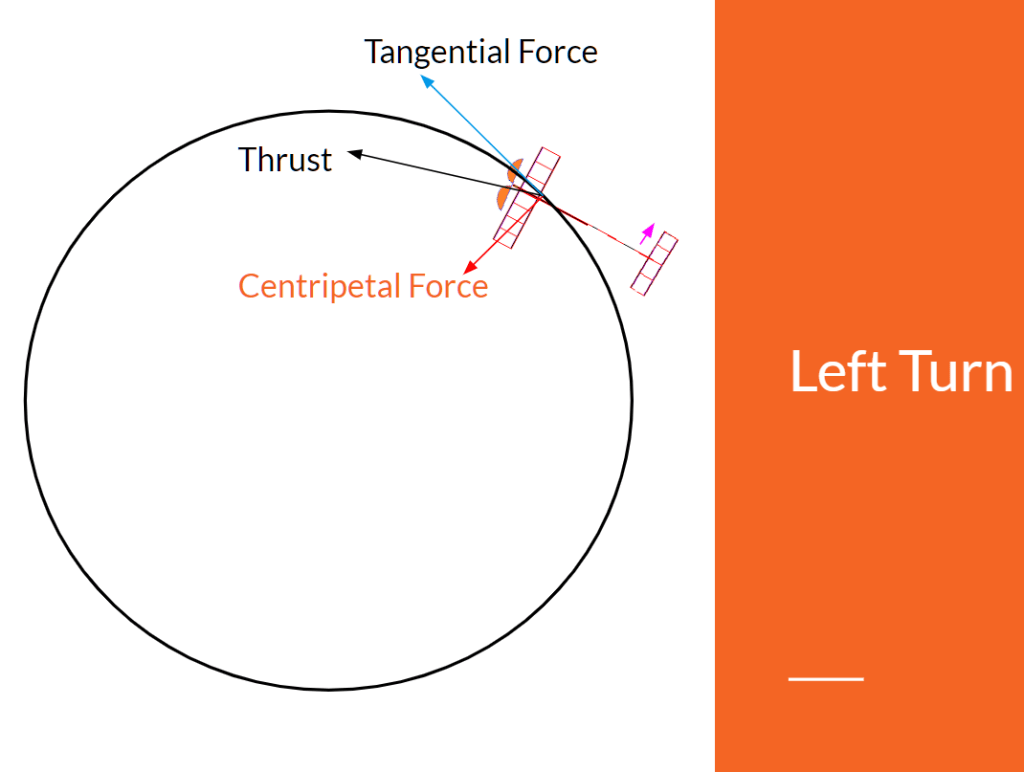
When the turning radius is too small or too big, check three things:
- Left thrust angle
- Left rudder angle
- Wash-in angle (more accurately, the whole wing’s twist.)
All three angles affect your turning radius, but each works differently depending on airplane speed. For example, a large left thrust creates a tight turn during the climb, because rubber band power is high. When the plane descends, the propeller thrust effect shrinks, and the rudder becomes the major turning factor. Shoot for a large, gentle turning circle to save energy and avoid creating extra drag.
Another angle, which is the motor stick to flight path angle (also known as the nose-up angle), heavily affects P-factor, which is the uneven pull that happens when a tilted propeller’s downward-moving blade bites harder into the air than the upward-moving blade. (See diagrams below.)
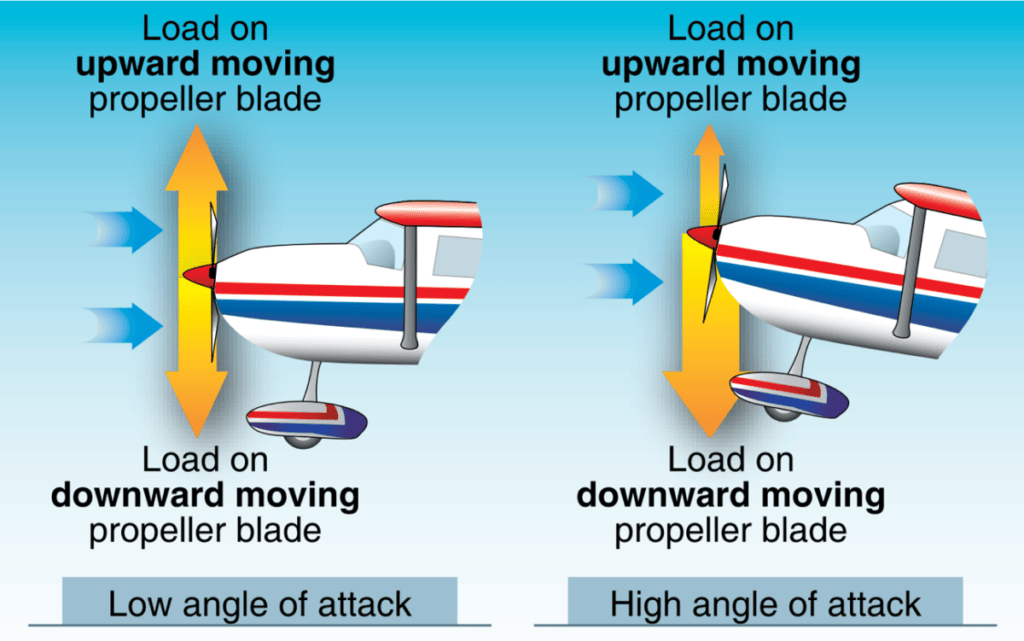
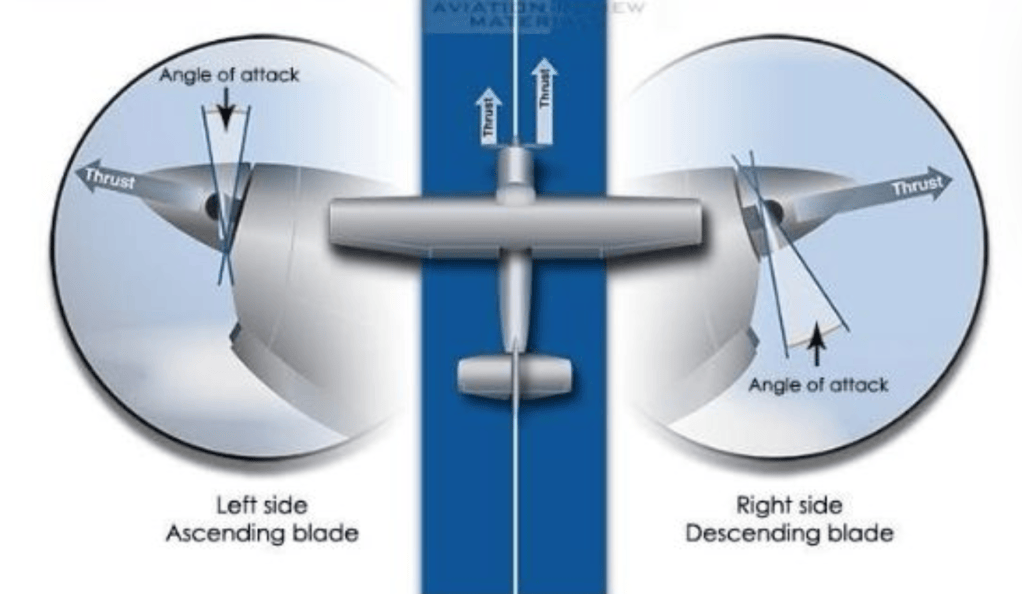
This P-factor in turn affects your turning radius in a big way. The nose-up angle changes during flight and is affected by airplane speed, propeller diameter, pitch, and thrust. It is trimmed at the field by moving the CG and changing the incidence. This nose-up angle should have been set by the previous pitch-trimming step. If you believe you have to change this P-factor to fix your turning radius problem, you can start by changing the propeller diameter and then the pitch.
Trimming Projection 3: The Longitudinal Axis (Keeping Wings Level)
For the third plane, the goal of adjustment on the longitudinal axis is straightforward: keep the wings level. The primary tools for this are the center rib offset and the wash-in angle.
Shifting the center rib to the right makes the left wing larger and farther from the center of gravity. (See the sketch below.) Similar to a seesaw balancing problem, this extra distance makes up for the slower speed and lower lift of the left wing during a left turn. The moments from both wing halves balance each other out and wing is kept level.
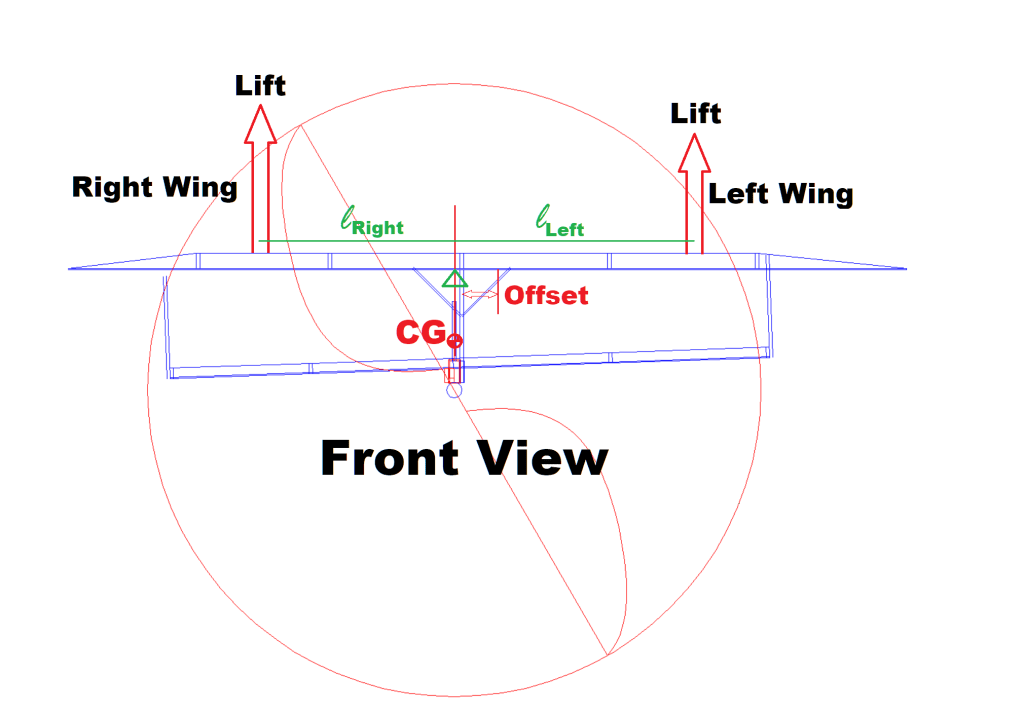
Because the center rib offset is built into the design, you cannot change it at the flying field. However, you can adjust the wash-in angle at the field. Because wash-in helps both keep your wings level and counter the strong propeller torque right after takeoff, and is sensitive, you should fine-tune this angle carefully and incrementally.
Handling Other Flight Anomalies
Other strange movements can happen during flight. Here are two common ones to watch out for:
- Skidding: This happens when there is too much left thrust. A skidding airplane drags its tail to the right like a drifting car and has a very tight turning radius. Fix this by reducing the left thrust angle.
- Dutch Roll: When this happens, the airplane wags its tail like a dog and rocks side to side like a boat in a wave pool at the same time. This occurs when the airplane’s side-to-side stability does not match its turning stability. You can fix it easily by increasing the rudder size.
All of these adjustments are part of a continuous process of optimization iteration. You will tweak one thing, test it, and then fine-tune something else. Again, “One thing at a time.” If you adjust multiple angles at once, you will get confused about which change is actually fixing the problem, or worse, crashing the airplane. For a bigger-picture look at how this works, you can refer to my very first post on my website, which outlines a general optimization approach. Feel free to ask if you need details on any of these. I am always happy to answer!
Cheers!
-AeroMartin 10/10/2026


Leave a Reply